CCNA And CCENT Tutorial: Access List Fundamentals
You must master ACL fundamentals to be successful in working with Cisco routers and switches. We’ll use them in this section primarily for blocking and denying traffic based on packet source and / or destination IP address, but ACLs are often used to identify traffic.
In this tutorial series, we’re going to concentrate on using ACLs to deny and permit traffic.
We’re going to see several different ACL types in action in this tutorial, and there are certain rules that apply to all ACL types. Before we work with specific ACLs, let’s have a look at some of these rules, beginning with these:
- Every ACL has an implicit deny at the end.
- The ACL searches for a match beginning with the top line, and when a match is found, that’s the end of the search. It’s not like a routing table search for the best match; an ACL search is for the first match.
The ACL Implicit Deny In Action
When a packet enters or exits an interface that has an ACL applied, at least one packet value is compared against the ACL on a line-by-line basis. Generally, that’s going to be the source IP address and / or the destination IP address. Here’s an example of a standard ACL. The explanation in the parenthesis is mine.
R1(config)#access-list 1 permit 10.1.1.1 0.0.0.0  (matches 10.1.1.1 only)

R1(config)#access-list 1 permit 10.2.1.1 0.0.0.0  (matches 10.2.1.1 only)

R1(config)#access-list 1 permit 10.3.1.1 0.0.0.0  (matches 10.3.1.1 only)

R1(config)#access-list 1 permit 10.4.1.1 0.0.0.0  (matches 10.4.1.1 only)
If you’re not familiar with ACL syntax, no worries; you will be when we’re done here! Right now, let’s concentrate on the overall operation of an ACL. Standard ACLs can only match on the source IP address of a packet, so that’s the value we’re working with here.
When that packet arrives on an interface with ACL 1 applied, the source IP address is compared against the ACL on a line-by-line basis. If the source IP address matches the first line of the ACL, the appropriate “permit” or “deny” action is taken, and that’s the end of the entire process. If there is no match, the packet value is compared against the second line of the ACL, and so forth, until a match is found.
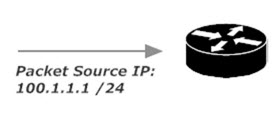
The source IP address of the packet is 100.1.1.1, and that is not a match for any line in the ACL. Again, the explanation in paren is mine — you won’t see that on an actual Cisco router.
R1(config)#access-list 1 permit 10.1.1.1 0.0.0.0   (no match)

R1(config)#access-list 1 permit 10.2.1.1 0.0.0.0   (no match)

R1(config)#access-list 1 permit 10.3.1.1 0.0.0.0   (no match)

R1(config)#access-list 1 permit 10.4.1.1 0.0.0.0   (no match)
When no match is found, the implicit deny is applied to the packet. The implicit deny is really an “invisible deny.” You won’t see a “deny any” line automagically added to your ACL, but it’s there. Since you don’t see it, it’s easy to forget about, especially if you’re new to ACLs. Forgetting about the implicit deny is the #1 reason for an ACL not giving you the desired results.
ACLs use wildcard masks to determine which part of an IP address should be examined for matches against ACL lines, and just as importantly, they indicate the part of the IP address that should not be so compared. In the next section of this tutorial, we’ll cover wildcard mask logic in depth, and then move on to standard and extended ACLs.
If you’re comfortable with wildcard masks, you can skip that page and head straight to the standard ACL lesson. A little review never hurts, though! : )
Speaking of review — be sure to check out my CCNA Practice Exam Pack and CCNA Subnetting Success Practice Exam Pack on Udemy!