


CCNA And CCNA ACL Lab: Where To Put ‘Em
It’s not enough to write the perfect ACL — you have to know where to apply it. That’s what this CCNA and CCENT tutorial is all about. Questions or comments? Tweet me!
The effectiveness of your ACL is determined by two things – the lines in the ACL and where you apply that ACL. In real-world networking, we’d prefer to block unwanted traffic as close to the source as possible so the minimum number of network devices (primarily routers and switches) have to handle traffic before that traffic is dropped.
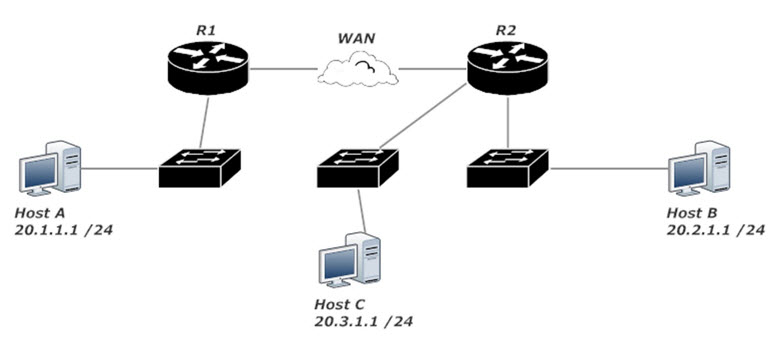
In this lab, we’ve been tasked with preventing packets sent by Host A from getting to Host B, while allowing Host A to communicate with Host C and with any hosts added in the future.
If Host A should not be allowed to send packets to Host B, it makes no sense to allow the packets to go from R1 to R2 and then deny them at R2. That’s unnecessary work for both R1 and R2. Why should R1 waste time routing those packets when they’re going to be dropped somewhere along the line?
The most efficient ACL application is to write an extended ACL and apply that ACL as close to Host A as possible. In this case, that would be the interface on R1 that leads to the switch. Have that interface match incoming packets against the ACL, and you’re all set. ACL 112 blocks traffic sourced from 20.1.1.1 and destined for 20.2.1.1 while allowing all other traffic.
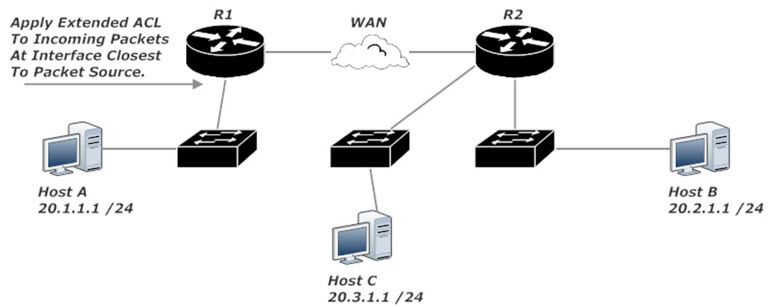
R1(config)#access-list 112 deny ip host 20.1.1.1 host 20.2.1.1

R1(config)#access-list 112 perm ip any any

R1(config)#int fast 0/0

R1(config-if)#ip access-group 112 in
If for some reason we’re forced to use a standard ACL, we can’t put it on R1. Standard ACLs match only on the source IP, so using one of those on R1 would block all traffic from Host A, violating the lab requirements.
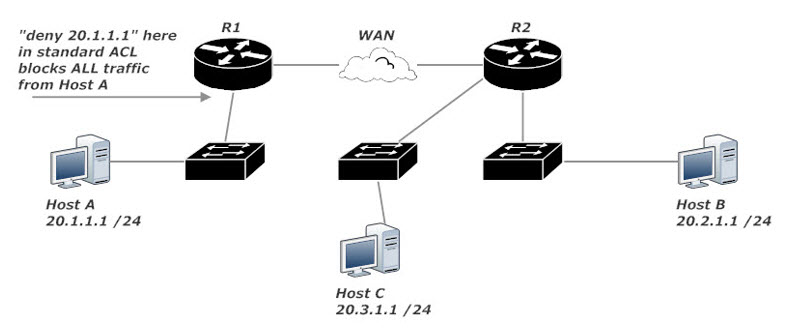
Generally speaking, standard ACLs should be applied on the interface closest to the destination. Writing a standard ACL on R2 and applying it to the interface leading to Host B is the only real solution here, and even then other hosts attached to the same switch as Host B would be unable to receive traffic from Host A. You wouldn’t want to apply a standard ACL to R2’s Serial interface; that would block all traffic from 20.1.1.1, including traffic destined for 20.3.1.1.
Frankly, just about the only time you’d use a standard ACL when a WAN’s involved would be an exam question or a job interview question.

R2(config)#access-list 2 deny host 20.1.1.1

R2(config)#access-list 2 permit any

R2(config)#int fast 0/0

R2(config-if)#ip access-group 2 out
A hidden benefit of filtering the packets with an extended ACL as they arrive on R1 rather than as they leave R1 has to do with the timing of ACL application. Outbound ACLs are applied after packets have already been sent to the outbound interface by the routing engine, but before they’re placed in a transmission queue. Inbound ACLs are applied before the routing engine handles them, which lessens the overall workload on our router. That’s another good reason to filter packets as close to the source as possible.
Coming up next, we’ll take a look at using prefix notation in wildcard masks. I’ll post that tutorial on August 4, 2018. Right now, have a look at these ACL tutorials and my CCNA Access List Playlist on YouTube, and thanks for coming by!